PinkGrayChevron

  • Subscribe to our RSS feed.
  • Twitter
  • StumbleUpon
  • Reddit
  • Facebook
  • Digg
Showing posts with label SPAritual. Show all posts

Tuesday, 20 March 2012

31 Day Challenge - Day 14 - Flowers

Posted on 04:00 by Unknown
Did you guess this one right? Flowers! How could I not do "Flower" from Bambi!? It was a perfect match.
You can also check out this other Bambi design I did a while back.


I started by painting all of my nails with Sinful Colors Black on Black. The middle nail is painted with SPAritual Eye of the Beholder with black acrylic paint already started for Flower's outline.

Then white acrylic paint. You can see I just splotched on the flower shapes on the non-"Flower" nail.

The rest I think is pretty self explanatory....


2 thick coats of Seche Vite to even everything out!

"Delicate" is next! Whatever shall I do? You'll have to wait and see! It's a good one!
Read More
Posted in 31 Day Challenge, acrylic paint, black, cartoon, Disney, floral, nail art, sinful colors, SPAritual, tutorial | No comments

Monday, 12 March 2012

Ovarian Cancer Awareness Nail Art Tutorial

Posted on 04:00 by Unknown
Today I have something very special to show you! I recently got in touch with Kelly from the National Ovarian Cancer Coalition and it was decided that breast cancer gets enough attention and it's time to show some teal tips! So here is a simple nail art design that you can recreate at home with the help of stuff you might already have lying around the house. We wanted to highlight the colors of the NOCC's logo, teal with touches of lime green.

(And I'm sorry that this looks so blue, and not teal.... that's my camera's problem. I promise in real life this polish is entirely teal!)

Step 1: Paint all of your nails with a base coat. I use Orly Nail Defense which you can buy at Sally Beauty Supply and CVS. This step is very important! It helps your polish last longer, with less chips. It also helps to prevent any yellow/green staining to your natural nail from these highly pigmented polishes.

Step 2: Paint 2 coats of a lime green nail polish. I used SPAritual Eye of the Beholder. Any lime green polish will do.

Step 3: You want to allow it a minute or two to dry. But you want it ENTIRELY dry before the next step. So to help speed things up, use a Quick Dry Top Coat. I applied 1 coat of Orly's Sec 'n Dry. (Seche Vite is also a good option).Within 5-10 minutes your manicure will be completely dry without risk of smudging or denting.

Then you grab these hole reinforcement stickers from your stash of office supplies. Hopefully you already have some lying around.

I pull out one sheet and cut the circles in half. I find this makes them lie down a little easier during the next step.

Pull half of a sticker off the sheet with tweezers. Best to use tweezers because you have more control over placement and it won't mess up any of your already painted nails.

Step 4: Line the sticker up with where your natural half moon falls. (I find it easiest to make the center hole in the sticker line up with my cuticle. Then they are always placed with the same width.)

Step 5: Press the sticker down so that there are no gaps and it lies smoothly with the curve of your nail.

Go ahead and sticker up all of your nails. You will then look silly like this:

Step 6: Paint 1-2 coats of your teal colored polish over the sticker and the exposed portion of your nail. Here I used Sinful Colors Savage.

Step 7:You can wait for the teal polish to dry, or you can do this while it's still wet. Using your tweezers again (so you don't mess up any of your nails) pull the stickers off gently. If your lime green polish is coming off with the sticker, you didn't let that step dry long enough. Pull the sticker off by pulling up and towards your cuticle, this will help you to have the sharpest line.

Next you will need a dotting tool of some sort. This is one I bought from eBay a while back, but you can use something simple that's already lying around the house. Cut a toothpick in half, use the rounded ends of a bobby pin, the pointed end of a pencil, anything...
This one is nice just because it already has 2 different sizes. One side is small:
The other side is slightly larger.

Step 8: Put a blob of nail polish in a darker teal (here I used Barielle A Bouquet for Ava) on a scrap piece of paper. Pick some up with the large side of your dotting tool (or the larger size of whatever you found around the house) to evenly space dots along the teal side of your manicure.

Step 9: Repeat the same process with your lime green polish again, but this time use the smaller end of your dotting tool and place the dots between your existing dots.

Step 10: You can stop here and add another layer of the Quick Dry Topcoat to finish things off. The topcoat helps to protect your art and make your manicure last longer.

Step 11: But of course it would be best to add a simple doodle of the cancer awareness ribbon to one of your nails as an accent. I just used the small side of my dotting tool to drag the dark teal polish into the ribbon shape.
Of course I'm very happy to have been able to share this simple design with you and I hope you have fun recreating it at home! And let us never forget the many women and families that have been affected by ovarian cancer in some way. Something as simple as painting your nails can help bring awareness to the need for more funding and research for a cure to ovarian cancer.
Read More
Posted in freehand, green, inspiration, nail art, orly, sinful colors, SPAritual, teal, tutorial | No comments

Tuesday, 21 February 2012

31 Day Challenge - Day 4 - Green

Posted on 04:00 by Unknown
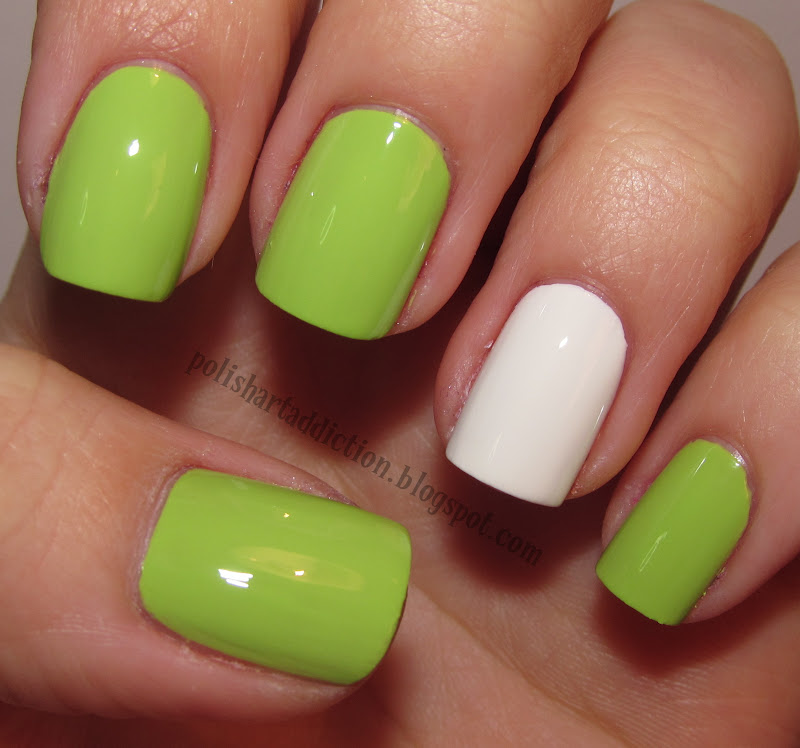
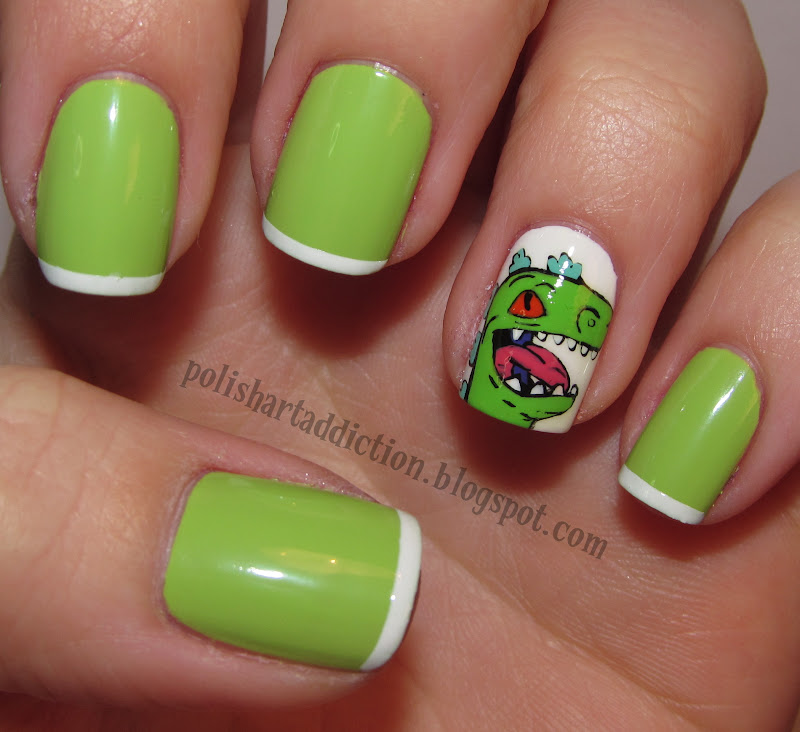
I loved the Rugrats when I was growing up and I've already done a nail art tutorial of them HERE. But I decided to feature Reptar for my green challenge. Reptar was a godzilla creature featured a lot through the Rugrats series as a popular movie character/toy. Despite his fierce look, he was often depicted as a hero. :)

I started with SPAritual - Eye of the Beholder and OPI Alpine Snow

Then acrylic paints for all of Reptar's face.


 Here I taped off the tips and used more OPI Alpine Snow for skinny french tips.

Then I stamped BM 224 using China Glaze For Audrey (it didn't stamp very opaque, so I had to go over it with a small brush & more polish)

Add a layer of top coat. I use Seche Vite.

Up close of Reptar, he is kinda cute after all!
Are you enjoying the challenge so far? 
Read More
Posted in 31 Day Challenge, acrylic paint, bundle monster, cartoon, freehand, french, green, nail art, Nickelodeon, OPI, SPAritual, tutorial | No comments
Older Posts Home
Subscribe to: Posts (Atom)

Popular Posts

  • Tough Girl
    I chose to an edgy look for this one. Combination of pink, a girly bow, and barbed wire. These rhinestone bows can be found for $2.98 at Bor...
  • Orly - Calypso Breeze
    Orly has been on Hautelook recently! I got this and another color a few weeks ago, but right now they have a different Orly bunch for sale...
  • L'Oreal Spring 2013 Versailles Romance Collection
    "L’Oréal Paris Versailles Collection L’Oréal Paris introduces its newest collection with pastel hues that create a porcelain effect. ...
  • Born Pretty Store Stencil
    Another attempt at the Born Pretty stencils found here for $3.09. You get 5 different patterns with 11 different sizes per sheet. My first ...
  • Born Pretty - Glequin Polka Dots
    Light purple "glequins" from the Born Pretty Store. They can be found here for $1.99. You can never go wrong with glitter... and t...
  • Rimmel 60 Seconds - Blue Eyed Girl
    I found a full display of new Rimmel 60 Seconds polishes at my local Walmart. 8mL of polish for $1.50, I couldn't pass it up. And it...
  • Magnetix Polish - Blue & Green
    These Magnetix polishes can be found at Rite Aid. I went in looking for something else and couldn't resist buying these two. They were $...
  • Born Pretty - Faux Acrylic Bows
    This is an interesting product available from Born Pretty. It gives the appearance of sculptured acrylic, but in reality it's a silicone...
  • Tammy Taylor Matte Neon Plush Glitters
    Tammy Taylor sent me some cool new products to try. These are glitters that are matte so you can use them for a 3D textured effect. Once the...
  • Marbelous Nails - That's Cray Kit
    I was contacted by the cutest CEO ever. Veronica is only 13 and has already pursued her dreams. She's started this company with the assi...

Categories

  • 2013 exhibit project (4)
  • 31 Day Challenge (29)
  • acrylic paint (46)
  • AEngland (2)
  • Alessandro (1)
  • anime/manga (5)
  • barielle (31)
  • black (25)
  • blog sale (1)
  • blue (104)
  • Born Pretty (45)
  • brown (24)
  • bullion beads (5)
  • bundle monster (47)
  • cartoon (64)
  • Cartoon Network (3)
  • catrice (2)
  • china glaze (126)
  • color club (33)
  • ColorPhase (1)
  • comic (8)
  • comparison (17)
  • contest (6)
  • coral (26)
  • crackle/shatter (2)
  • cult nails (4)
  • cuticle oil (1)
  • Dazzle Dry (1)
  • Deborah Lippmann (6)
  • decals (10)
  • Different Dimension (1)
  • Disney (36)
  • DIY crafts (3)
  • DreamWorks (1)
  • duochrome (9)
  • Duri (1)
  • e.l.f. (2)
  • essence (5)
  • essie (36)
  • etsy (1)
  • extras (9)
  • eyeko (3)
  • fail (1)
  • fairytale/fable (1)
  • feathers (1)
  • finger paints (2)
  • flakie (10)
  • flocking (2)
  • floral (7)
  • Flower (1)
  • foil glue (2)
  • for sale (1)
  • FOX (2)
  • franken (4)
  • freehand (87)
  • french (21)
  • gel polish (5)
  • giveaway (7)
  • glequin (5)
  • glitter (78)
  • Glitter Gal (4)
  • GlitterDaze (1)
  • gold (20)
  • GOSH (2)
  • gradient (23)
  • gray (14)
  • green (39)
  • guest post (20)
  • hard candy (2)
  • holographic (12)
  • HTF (6)
  • Incoco (3)
  • indie (3)
  • inspiration (66)
  • Jamberry (1)
  • jelly (3)
  • jewelry (2)
  • KBShimmer (2)
  • kiss nail art (11)
  • KleanColor (6)
  • konad (15)
  • L'Oreal (2)
  • LA Colors (2)
  • LA Girls (2)
  • leather effect (1)
  • Lime Crime (11)
  • love and beauty (2)
  • LuxeCoat (1)
  • lynnderella (3)
  • M.A.S.H. (19)
  • magnetic (3)
  • Magnetix (1)
  • matte (8)
  • Maurice's (1)
  • megan miller (2)
  • metallic (7)
  • milani (10)
  • mood polish (1)
  • multichrome (1)
  • Nabi (1)
  • nail art (208)
  • nail art diva (2)
  • Nail-Venturous (2)
  • Nails Inc (1)
  • NCLA (2)
  • Neener Neener Nails (1)
  • neon (33)
  • Nick Jr. (2)
  • Nickelodeon (5)
  • non-polish (10)
  • novelty (1)
  • nude (16)
  • nutra nail (2)
  • NYC (1)
  • ombre (2)
  • OPI (31)
  • orange (25)
  • orly (38)
  • Otaku Polish (1)
  • party (1)
  • Peculiar Polish (15)
  • pink (101)
  • Pixar (2)
  • polish remover (1)
  • Precision (2)
  • product review (85)
  • pure ice (5)
  • purple (93)
  • red (41)
  • revlon (5)
  • rhinestones (11)
  • Rimmel (5)
  • Ruby Wing (3)
  • ruffian (1)
  • s-he (1)
  • sally hansen (56)
  • Santee (1)
  • Sation (5)
  • scented (1)
  • Seche Vite (1)
  • SensatioNAIL (1)
  • Sephora by OPI (1)
  • Shimmer Polish (27)
  • Silky Polish (2)
  • silver (6)
  • sinful colors (57)
  • Sonoma Nail Art Polish (3)
  • SPAritual (3)
  • Speciallità (6)
  • Spoiled (6)
  • sponging (24)
  • spotted (2)
  • stash (2)
  • stencil (2)
  • storage (1)
  • studs (13)
  • swatch (187)
  • Tammy Taylor (6)
  • tape (17)
  • teal (46)
  • textured (3)
  • the Balm (9)
  • tips n tricks (5)
  • toes (6)
  • tools (3)
  • tutorial (57)
  • U-Neek (1)
  • University Nail Pax (2)
  • Vapour Organic (1)
  • video (1)
  • viva la nails (2)
  • Warner Bros (2)
  • water decals (2)
  • water marble (4)
  • wear test (4)
  • wet n wild (21)
  • white (33)
  • woven (1)
  • yellow (29)
  • zoya (35)

Blog Archive

  • ▼  2013 (156)
    • ▼  August (4)
      • Stripes & Flowers
      • Marbelous Nails - That's Cray Kit
      • Tammy Taylor - Gelprisa! Ca. French Pink
      • Tammy Taylor Matte Neon Plush Glitters
    • ►  July (21)
    • ►  June (19)
    • ►  May (20)
    • ►  April (26)
    • ►  March (14)
    • ►  February (24)
    • ►  January (28)
  • ►  2012 (342)
    • ►  December (20)
    • ►  November (23)
    • ►  October (20)
    • ►  September (22)
    • ►  August (27)
    • ►  July (37)
    • ►  June (33)
    • ►  May (19)
    • ►  April (33)
    • ►  March (33)
    • ►  February (32)
    • ►  January (43)
  • ►  2011 (2)
    • ►  December (2)
Powered by Blogger.

About Me

Unknown
View my complete profile