I recently did a guest post for my friend Amanda! You can check it out here.
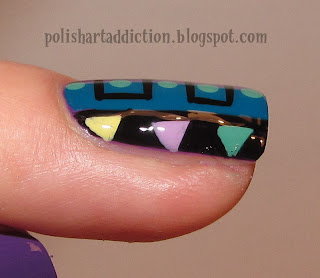
"Hi Amandalandish inhabitants! I'd like to share with you a tutorial for an accent nail that looks more complicated than it really is. If you really wanted to blow people's minds you could do each nail with this pattern! I'll break it down so you can see each step. The only secret is to use polishes that are opaque in one coat, and fairly fast drying."
"Hi Amandalandish inhabitants! I'd like to share with you a tutorial for an accent nail that looks more complicated than it really is. If you really wanted to blow people's minds you could do each nail with this pattern! I'll break it down so you can see each step. The only secret is to use polishes that are opaque in one coat, and fairly fast drying."
I started with Barielle Grape Escape. I used 2 coats.
Pick an accent nail. Make sure it's dry.
Then I used a black striper polish to do a line down each side and fill out to the edge.
Then I used 1 coat of Barielle A Bouquet for Ava to divide the middle purple section in half. Use a small paintbrush, or if the previous steps are completely dry you can mask off the area with scotch tape.
Then I used the same black striper polish to do the following lines across the middle section.
Same thing for these lines.
Then I used a medium sized dotting tool to add these dots of Barielle Sweet Addiction. Just go down the middle dividing line between the teal and purple sections.
Then I made triangles along the black sections. This wasn't that hard. I just used my smallest dotting tool and basically did 3 dots close together. They don't have to be perfect triangles just yet.
These light teal dots are made using Barielle Sweet Addiction.
Repeat the same 3 dots close together to make some light purple triangles. I used Barielle Expressive.
Same thing for yellow triangles. I used China Glaze Lemon Fizz.
At this point my triangles did not have sharp corners, so I took my black striper polish to straighten the sides of each triangle. That perfected them.
Wait until your nail art is dry (give it 10 minutes to be safe) and apply a layer of topcoat. This will help to smooth it out and last longer! If you apply the topcoat too soon, you risk smudging the art. That would not be good after all the time it took.
Here are all of the polishes I used: Barielle Grape Escape, A Bouquet for Ava, Expressive, Sweet Addiction, China Glaze Lemon Fizz, & Kiss Nail Art striper in black.
So there you have it! It's a lot of little steps, but once you break it down.... each step is not too difficult. With patience you can recreate it! The benefit of using fast drying/one coater nail polishes, is that the layers will not be too thick and difficult. If each step were done with a thick gloopy coat of nail polish, it would NEVER dry! So the secret is to be thin.
"Thanks for inviting me Amanda! And thank you to all of you followers that read this! Come and see me sometime. ;)"


0 comments:
Post a Comment